

Add a field to gatsby-theme-blog
April 18th, 2020

I've converted my blog to gatsby-theme-blog recently. It gives me an opportunity to play with themes and understand them better.
Most tutorials on the official Gatsby website work well with gatsby-blog-starter but there are differences for the theme. We will see some of these differences by adding a new field to the theme.
Adding the field to some of your posts
We will add a heroImage field. It will be a File field containing an image that will be used for social media sharing. We will add all necessary meta tags so that it looks great when you share it on Twitter. It should also looks great on other social media websites.
Let's start by adding the field to an article.
---
title: "My super article"
date: "2020-04-18T14:00:00.000Z"
description: "Really worth reading!"
heroImage: "./image-that-makes-you-want-to-click.jpg"
---

...
Declaring the schema type
Gatsby can infer type to fields. It is however recommended to explicit the type. That's what we will do by editing the gatsby-node.js file and modifying the schema.
// This part comes from gatsby-theme-blog-core/gatsby-node.js
const mdxResolverPassthrough = fieldName => async (
    source,
    args,
    context,
    info
) => {
    const type = info.schema.getType(`Mdx`)
    const mdxNode = context.nodeModel.getNodeById({
        id: source.parent,
    })
    const resolver = type.getFields()[fieldName].resolve
    const result = await resolver(mdxNode, args, context, {
        fieldName,
    })
    return result
}

exports.createSchemaCustomization = ({actions, schema}) => {
    const {createTypes} = actions
    createTypes(`interface BlogPost @nodeInterface {
      id: ID!
      title: String!
      body: String!
      slug: String!
      date: Date! @dateformat
      tags: [String]!
      keywords: [String]!
      excerpt: String!
      heroImage: File
    }`) // adding heroImage as an optional File field to BlogPost

    createTypes(
        schema.buildObjectType({
            name: `MdxBlogPost`,
            fields: {
                id: {type: `ID!`},
                title: {
                    type: `String!`,
                },
                slug: {
                    type: `String!`,
                },
                date: {type: `Date!`, extensions: {dateformat: {}}},
                tags: {type: `[String]!`},
                keywords: {type: `[String]!`},
                excerpt: {
                    type: `String!`,
                    args: {
                        pruneLength: {
                            type: `Int`,
                            defaultValue: 140,
                        },
                    },
                    resolve: mdxResolverPassthrough(`excerpt`),
                },
                heroImage: {
                    type: `File` // adding heroImage as an optional File field to MdxBlogPost
                },
                body: {
                    type: `String!`,
                    resolve: mdxResolverPassthrough(`body`),
                },
            },
            interfaces: [`Node`, `BlogPost`],
        })
    )
}
There might be a more condensed way to add a field but I haven't managed to find it yet. I will edit the article when I do.
Adding the new field to the node
With gatsby-blog-starter, the header fields of the article used to be accessed via frontmatter. Now look at this part from gatsby-theme-blog-core/gatsby-node.js:
//...

    const fieldData = {
      title: node.frontmatter.title,
      tags: node.frontmatter.tags || [],
      slug,
      date: node.frontmatter.date,
      keywords: node.frontmatter.keywords || [],
    }

//...
The fields are directly added to the content node so that you can access them like this: const title = post.title.
We will add our heroImage field by editing our gatsby-node.js and adding this:
//...

exports.onCreateNode = async (
    {node, getNode}
) => {
    if (node.internal.type === "MdxBlogPost") {
        const parentNode = getNode(node.parent)
        node.heroImage = parentNode.frontmatter.heroImage
    }
}

//...
Using our new field in the SEO component.
We will use gatsby-theme-blog/src/components/seo.js and shadow it in our repository by adding a src/gatsby-theme-blog/components/seo.js file. If you are not familiar with shadowing, I recommend that you read about it first.
I would have loved to extend the file more elegantly by just adding the new headers to Helmet but at the moment, I'd rather have it work. I'll edit this if I find a better way than copy and paste the entire file.
Here is the modified file with comments:
/**
 * SEO component that queries for data with
 *  Gatsby's useStaticQuery React hook
 *
 * See: https://www.gatsbyjs.org/docs/use-static-query/
 */

import React from "react"
import PropTypes from "prop-types"
import Helmet from "react-helmet"
import {useStaticQuery, graphql} from "gatsby"

function SEO({description, lang, meta, keywords, title, imageUrl, slug}) { // adding imageUrl and slug (we will see why later) to the signature. We will have to provide it in the "post" component.
    const {site} = useStaticQuery(
        graphql`
            query {
                site {
                    siteMetadata {
                        title
                        description
                        author
                        siteUrl
                        social {
                            handle
                        }
                    }
                }
            }
        `
    ) // adding siteUrl and a social handle for further SEO changes

    const metaDescription = description || site.siteMetadata.description

    return (
        <Helmet
            htmlAttributes={{
                lang,
            }}
            title={title}
            titleTemplate={`%s | ${site.siteMetadata.title}`}
            meta={[
                {
                    name: `description`,
                    content: metaDescription,
                },
                {
                    property: `og:title`,
                    content: title,
                },
                {
                    property: `og:description`,
                    content: metaDescription,
                },
                {
                    property: `og:type`,
                    content: `website`,
                },
                {
                    ...slug ? {
                        property: `og:url`,
                        content: new URL(slug, site.siteMetadata.siteUrl),
                    } : {}
                }, // If we have a slug, we add the open graph url entry. Twitter uses it in its example: https://developer.twitter.com/en/docs/tweets/optimize-with-cards/guides/getting-started
                {
                    ...imageUrl ? {
                        property: `og:image`,
                        content: new URL(imageUrl, site.siteMetadata.siteUrl)
                    } : {}
                }, // The open graph image that will use our heroImage in the article. You might want to add a default image if none is provided.
                {
                    ...imageUrl ? {
                        name: `twitter:card`,
                        content: `summary_large_image`
                    } : {
                        name: `twitter:card`,
                        content: `summary`
                    }
                }, // I changed this one. The default was "summary". Large images attract more clicks. If there is no image then we fallback to summary.
                {
                    name: `twitter:site`,
                    content: site.siteMetadata.social[0].handle,
                },
                {
                    name: `twitter:creator`,
                    content: site.siteMetadata.social[0].handle,
                }, // I changed the twitter:site and twitter:creator from the author value to the handle value that I added to gatsby-config.js. It is what Twitter recommands.
                {
                    name: `twitter:title`,
                    content: title,
                },
                {
                    name: `twitter:description`,
                    content: metaDescription,
                },
            ]
                .concat(
                    keywords.length > 0
                        ? {
                            name: `keywords`,
                            content: keywords.join(`, `),
                        }
                        : []
                )
                .concat(meta)}
        />
    )
}

SEO.defaultProps = {
    lang: `en`,
    meta: [],
    keywords: [],
}

SEO.propTypes = {
    description: PropTypes.string,
    lang: PropTypes.string,
    meta: PropTypes.array,
    keywords: PropTypes.arrayOf(PropTypes.string),
    title: PropTypes.string.isRequired,
}

export default SEO
Providing the image from the post
I've already shadowed src/gatsby-theme-blog/components/post.js. We will change the line where we use the SEO component:
<SEO title={post.title} description={post.excerpt} imageUrl={post?.heroImage?.childImageSharp?.fluid?.src} slug={post.slug}/>
Note that we use the optional chaining to handle cases where the heroImage is not defined without returning an error.
Make sure to also add heroImage to your GraphQL request. It should be in the post-query.js template. If you have not shadowed it yet, you must in order to add the field.
Tada 🎉
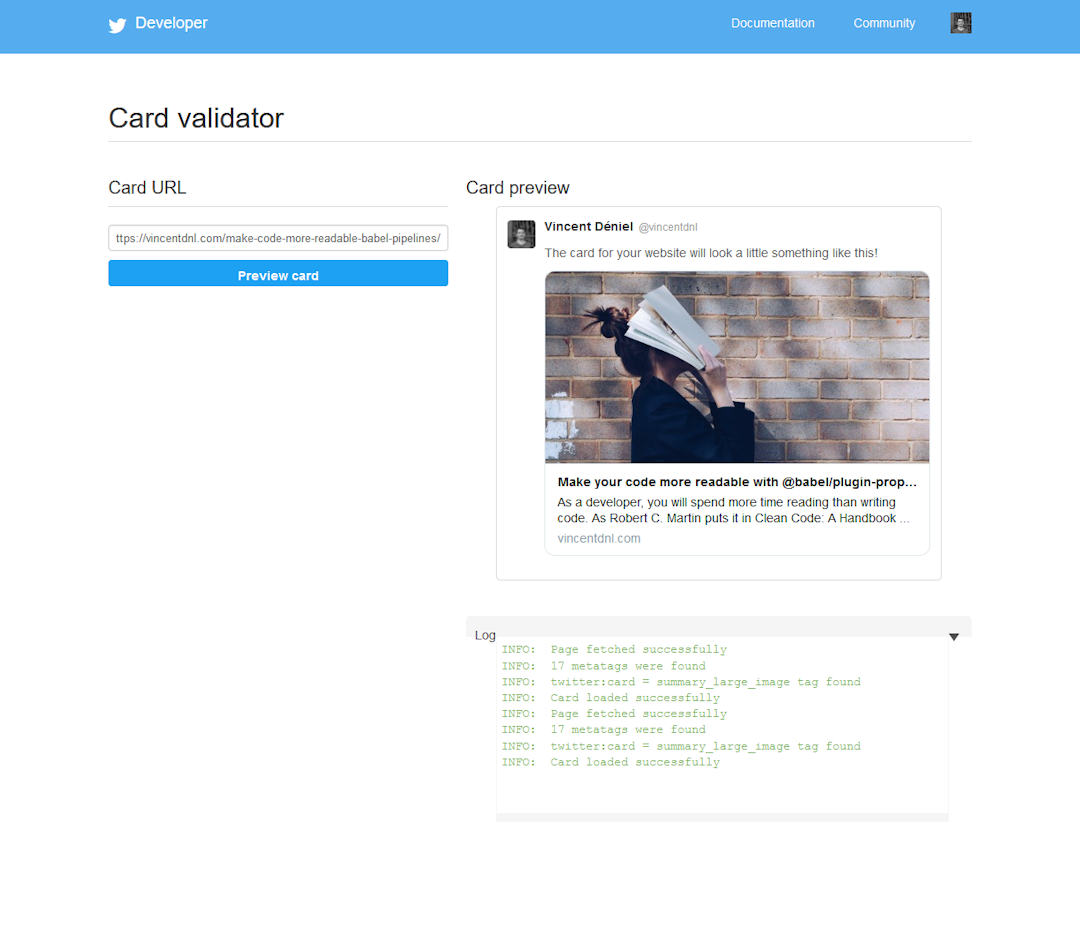
We are done here. You now have a heroImage field that is used by as your meta fields to display properly on Twitter and other social media!
To check how your posts look like, you can use the Twitter Card Validator to make sure everything displays right.
Possible improvements
I find that the code is not perfect at the moment. Here are some points I want to address in the future:
- Extend type definition in
gatsby-node.jsmore elegantly. - Extend the
seo.jscomponent more elegantly. - Adding a default
heroImagefor when someone share your website root and not a specific article for example.